- Published on
Building a newsletter subscription with Directus.
- Authors
-
-

- Name
- Raphaël Becanne
- @rbecanne
-
Main context
I will show one way of implementing a newsletter subscription form using Directus as the backend. I am sure that some other method exists though.
I assume that you have some understanding of a Flow, and how to modify Role & permissions, and add fields to an existing Directus table. If not, please refer to Directus Documentation.
The subscription process for the user is quite simple: she enters her email, and receive an email confirming the registration. In this email, there is a link to unsubscribe if needed, using a token.
This example can easily be complexified with an email validation process. I will explain how it could be done after.
I am personnaly using Next.js to build my front, but any front would do, since you just need to be able to do an API call.
Table of Contents
Configuring Directus
Adding a new field to directus_users table
I have decided that every person subscribing to my newsletter would be a Directus user with a limited role. This allows me to have tokens that can help me authenticate the user for the unsubscribe process, as we will see.
The token field already exist in the directus_users table.
For simplicity, I have added a newsletter field directly into the directus_users table. It is a dropdown with two possible values: active or unsubscribe. The field is active by default since I am not following the validation email pattern. If you wanted to follow this pattern, see the _Final Thought_ part of this post.
Adding a new role and giving it permissions
I created a new role named _"Prospect"_ for users, because I was launching a SaaS and wanted to see if there were some prospects before the official release. And of course, if there was, tell them when the SaaS was ready in a newsletter.
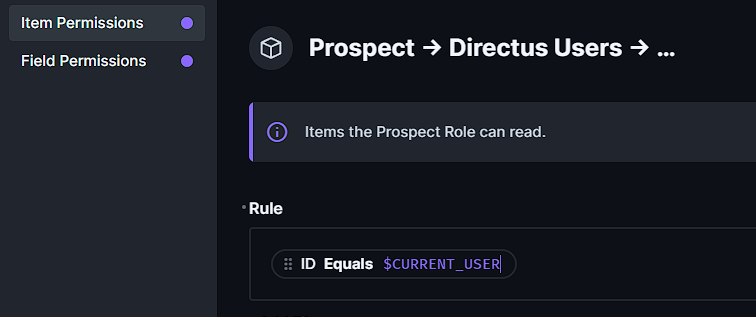
This Prospect role needs permissions to update only two fields: newsletter to set it to unsubscribe if needed and its token field. We should also give it the permission to read the newsletter field. When updating the _Field Permissions_, be sure to add an _Item Permissions_ ID Equals $CURRENT_USER to avoid the user to manipulate other people's data.
Modifying the Public role permissions
1. Retrive the Role ID for the Prospect Role
Then, I changed the Public role authorization to allow anyone to create new users, but only with a Prospect role. Indeed, a user on your website who is not authenticated is just a Public user. So it is the Public role that needs to be allowed to create new users. However, we do not want them to create an Admin for example.
To do that, get the Role ID by going on the _users page_ in Directus and retrieve it in the URL.

2. Update the Public role's Permissions to create Prospect users.
Next, you will go in the _Settings > Role & Permissions_ to allow Public role to create _Directus Users_ with specific constraints: email, status, role, provider and token for _Field Permissions_. These fields are required when you want to use the API to create a new user (except token that we will use latter).

In the _Field Validation_ menu, add a filter: Role is one of . I remember trying to add Role equals but that did not work for some reasons.
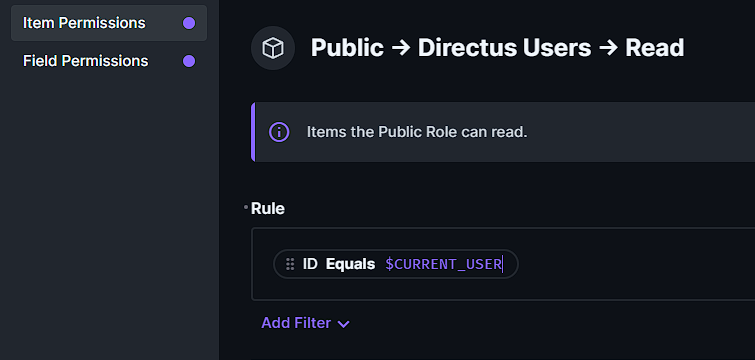
3. Update the Public role's Permissions to read Prospect users.
Finally, you want the Public role to be able to retrieved at least something after making the request to create a user, in order to know everything worked correctly. In the _Read_ property for _Directus Users_, allow the Public role to see the newsletter field that we created for the User.
Basically, it means that if someone knows that you have a Directus backend, and that you use the Directus Users system to register Newsletter in a field named newsletter, she could make an API call and get... all the data in newsletter field. So the maximum she can get would be the number of active users for your newsletter, and the number of unsubscribed users.
So we bypass that awefull possibily by adding an _Item Permissions_ with: ID Equals $CURRENT_USER. This way, the Public user will not be able to get the number of subscriber to our newsletter :)
Creating a Flow to send a confirmation email and an unsubscribe link
The Flow is really simple and should look like that:
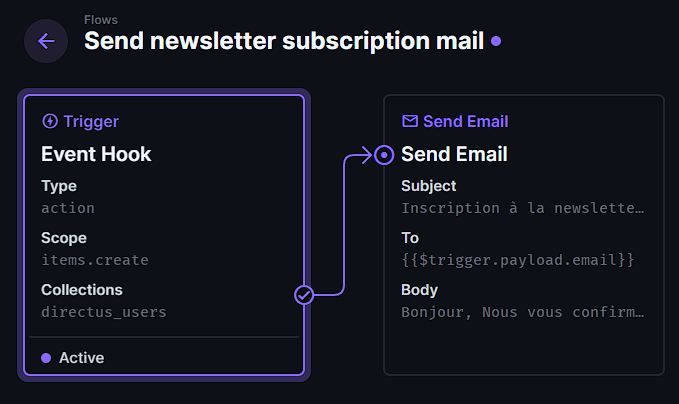
First, we put a trigger on the items.create of the directus_users table. Then, we create a Send Email operation with the following requirements:
{{$trigger.payload.email}}in the To field. Do not forget to pressEnter. If you do not see a purple bloc appearing with your value under the To field, it will not work.- Something like
https://your-front.com/unsubscribe?token={{$trigger.payload.token}}inside your email's body.
The token refers to a generated token that Directus will create for us after an API request we will make in the frontend part.
And this is it for the Directus part. Of course, be sure to properly configure the email sending. This is not part of this tutorial. I shall do one soon. However, Directus uses Node Mailer to send emails if that might help you.
Preparing your front
Creating the user
I let you handle the form part of your frontend. You just need to have one field that retrieve one email.
My code for the mutation looks like this (I am using GraphQL and not REST here). First, I call the utils/random/string endpoint to get a random token that I will assign to the newly created user (yes, this can be done with another Flow though). Then, I do a mutation to create the user with the brand new token.
import { gql } from 'graphql-request'
const url = process.env.NEXT_PUBLIC_API
const roleId = process.env.NEXT_PUBLIC_PROD_PROSPECT_ROLE_ID
async function generate_random_token() {
  // This function generates a random token using an API
  // call to your Directus.
  const headers = {
    'Content-Type': 'application/json',
  }
  return await fetch(url + 'utils/random/string', {
    method: 'GET',
    headers,
  })
    .then((res) => res.json())
    .catch((error) => {
      console.log('random token error:', error)
      return 'error'
    })
}
export const createUser = async (email) => {
  // First retrieve a token generated by Directus
  const get_token = await generate_random_token()
  const token = get_token.data
  if (token === 'error') return token
  const headers = {
    'Content-Type': 'application/json',
  }
  const query = gql`
    mutation {
      create_users_item(
        data: {
          email: "${email}"
          role: "${roleId}"
          status: "active"
          provider: "default"
          token: "${token}"
        }
      ) {
        newsletter
      }
    }
  `
  // Fetch data from external API
  return await fetch(url + 'graphql/system', {
    method: 'POST',
    headers,
    body: JSON.stringify({
      query,
    }),
  })
    .then((res) => res.json())
    .catch((error) => {
      return 'error'
    })
}
Notice here that I have more fields than juste email and token. The other fields are required to create users with an API call.
Creating a page to unsubscribe
I have created a page on my front which is built using Next.js It looks like that:
import { gql } from 'graphql-request'
import FrontFooter from '../components/front/footer'
import FrontNavBar from '../components/front/frontNavBar'
export default function Unsubscribe({ data }) {
  return (


          You are now unsubscribed to our newsletter


  )
}
// This gets called on every request
export async function getServerSideProps(context) {
  const token = context.query.tok
  const headers = {
    'Content-Type': 'application/json',
    Authorization: `Bearer ${token}`,
  }
  // nullify the token in the mutation
  const query = gql`
    mutation {
      update_users_me(data: { newsletter: "suspended", token: ${null} }) {
        newsletter
      }
    }
  `
  // Fetch data from external API
  const res = await fetch(process.env.DIRECTUS_PUBLIC_API + 'graphql/system', {
    method: 'POST',
    headers,
    body: JSON.stringify({
      query,
    }),
  })
  const data = await res.json()
  if (data?.update_users_me?.newsletter === 'suspended') return { props: { data: true } }
  else return { props: { data: false } }
}
The token: ${null} in the mutation allows us to:
- avoid that the user try to unsubscribe more than one time.
- ensure us the user will not to make any API calls in the future.
No token = No API call. It's as simple as that :)
Caveat with this method
Using the "new User method" to create newsletter's subscribers, you have to be aware of one thing: the email field in the directus_users table has the property UNIQUE. Hence, if this allows you to ensure someone does not register multiple times, you have to take care of this if you want people to register as users for other part of your site.
For instance, if you create a Customer role in the future, be aware that you will have to handle the switch between Prospect users and Customer ones. If you forget, then the Customer creation for someone already in the Prospect list will fail.
Expanding with a validation process
This example can be complexified to add a validation process for the email entered. For example, instead of sending an email with an unsubscribe link, it could be a validation link based on the same principle.
Once the user clicks on this link and is directed to a page on your front, an API call to switch the newsletter value from _not validated_ to _validated_ is done. So you might create a newsletter field inside the directus_users table to be _not validated_ by default, with two other values possible: _validated_ or _unsubscribed_.
You can also choose to create a new token for the user to be sure that the validation link does not work anymore, and that the new token is used only to unsubscribe.
Final words
I hope this tutorial helped you in any way. If something was unclear, please leave a comment below so I can clarify myself.